
Japanese Cheesecake is a divine dessert that captivates the senses with its ethereal lightness and creamy texture. This fail-proof recipe ensures that even novice bakers can achieve an incredibly fluffy, melt-in-your-mouth cheesecake that makes everyone feel truly special. The delightful balance of sweetness and a hint of tanginess from the lemon juice creates a comforting, nostalgic flavor that’s perfect for family gatherings or a sweet indulgence after a long day. With this step-by-step guide, you’ll be able to craft your very own Japanese Cheesecake that’s bound to impress!
Ingredients
- 8 oz (230g) Philadelphia cream cheese – This rich and creamy delight forms the base of the cheesecake, giving it a luxurious texture and flavor.
- 2 oz (60g) unsalted butter – Adds a hint of richness that enhances the overall taste of the cake, making it decadently buttery.
- 100 ml full milk – This creamy ingredient helps create a smooth batter and contributes to the soft consistency of the cheesecake.
- 2 oz (60g) cake flour – A fine flour that ensures the cake remains light and airy while providing structure.
- 1 oz (30g) cornstarch – Acts as a stabilizer for the cake, ensuring it has the perfect amount of fluffiness.
- 6 egg yolks (room temperature) – Enhance the richness and contribute to the cake’s beautiful yellow hue.
- 1/2 tablespoon lemon juice – Infuses a subtle zestiness, brightening the flavors and balancing the sweetness.
- 1/4 tsp salt – Enhances the overall flavors and rounds out the sweetness of the dessert.
- 6 egg whites (room temperature) – Crucial for making the light and airy meringue that creates the cheesecake’s signature rise.
- 1/4 teaspoon cream of tartar – Helps stabilize the egg whites for a perfect meringue consistency.
- 5 oz (140g) fine granulated sugar – Sweetens the cheesecake beautifully while aiding in achieving a perfect meringue.
Step-by-Step Directions
-
Preheat and Prepare: Begin by preheating your oven to 325°F (160°C). Prepare and measure all your ingredients, setting them within easy reach. Using a 9-inch springform pan, grease it thoroughly and line the bottom with parchment paper to prevent sticking.
-
Melt the Base: On a stovetop, melt the cream cheese, unsalted butter, and full milk over low heat. Utilize a whisk to mix until the cream cheese is completely melted and smooth, ensuring there are no lumps. Once melted, remove from heat.
-
Sift and Mix: Sift together the cake flour and cornstarch in a separate bowl. In your cream cheese mixture, add the egg yolks, lemon juice, and salt, and whisk until well combined. Gradually incorporate the sifted flour and cornstarch, whisking until a velvety batter forms without lumps.
-
Make the Meringue: In a clean mixing bowl, whip the egg whites with cream of tartar until they become light and foamy. Gradually add in the granulated sugar as you continue to whip, forming soft peaks—this should take about 1-2 minutes. Be careful not to over-beat!
-
Combine Mixtures: Gently fold the cream cheese mixture into the meringue, taking care not to deflate the bubbles. This folding method infuses the meringue into the batter, retaining that all-important airiness.
-
Pour and Bake: Pour the cheesecake batter into the prepared springform pan. Tap it gently on the counter to remove any air bubbles. To bake, create a hot water bath by placing the filled cake pan into a larger pan. Fill the larger pan with 1 inch (2.5 cm) of hot water. Bake on the bottom shelf of your oven for approximately 1 hour and 10 minutes.
-
Cool Gradually: When baking time is up, leave the cheesecake in the oven with the door slightly ajar for about 30 minutes. This gradual cooling helps to prevent any sudden temperature changes that could cause the cake to shrink. It’s normal for the cake to shrink about half an inch (1 cm) to 1 inch (2.5 cm) as it cools.
-
Chill and Serve: After cooling, refrigerate the cheesecake (with or without the cake tin) for at least 4 hours, or ideally overnight. Before serving, dust the top with powdered sugar for an elegant finish.
Tips & Tricks
- Room Temperature Ingredients: Ensure that your cream cheese, butter, and eggs are at room temperature for the best integration.
- Meringue Mastery: Keep your mixing bowls and whisk clean; any fat can prevent the egg whites from whipping up properly.
- Avoid Overbeating: When making your meringue, stop as soon as you reach soft peaks – overbeating can lead to a grainy texture.
- Test for Doneness: The cheesecake is ready when it is set but still slightly wobbly in the center. It will continue to firm up as it cools.
- Flavor Variations: Experiment with flavorings such as vanilla extract or matcha powder to customize your cheesecake.
Serving Suggestions & Pairings
Japanese Cheesecake is best served chilled and can be enjoyed on its own or paired with fresh fruits like strawberries or blueberries for added freshness. For special occasions, drizzle a light fruit sauce or serve it with a dollop of whipped cream. Perfect for afternoon tea, birthday celebrations, or as a delightful end to a family meal, its elegance and delicious flavor make it an instant favorite.
Nutritional Information
This Japanese Cheesecake yields approximately 12 servings, with each slice containing around 200 calories. It is essential to enjoy desserts in moderation as part of a balanced diet. This cheesecake contains a good amount of protein and fats while offering carbs primarily from the flour and sugar.
Storing Tips & Variations
To store the cheesecake, cover it with plastic wrap or store it in an airtight container in the refrigerator where it can last for up to one week. If you’d like to freeze it, wrap it tightly in plastic wrap and foil; it will keep for up to three months. When ready to enjoy, simply thaw it in the refrigerator overnight. Variations include adding flavored extracts, such as almond or vanilla, or incorporating cocoa powder for a chocolate twist.
Conclusion
Japanese Cheesecake is a delightful dessert that captures the hearts and taste buds of everyone who tries it. With this fail-proof recipe, you’ll have the confidence to bake this fluffy delight at home. Don’t forget to share your experiences and feedback once you take a slice of this charming cheesecake!
FAQs
-
Can I use low-fat cream cheese for this recipe?
- It’s best to use full-fat cream cheese for the creamiest texture. Low-fat alternatives may not yield the same results.
-
Why is my cheesecake shrinking?
- Shrinking is common as it cools. Allowing it to cool gradually in the oven helps minimize this issue.
-
Can I make this cheesecake ahead of time?
- Absolutely! It can be made a day in advance and stored in the refrigerator until you’re ready to serve.
-
What can I substitute for cornstarch?
- You can replace cornstarch with extra cake flour, but you may sacrifice some lightness.
-
How do I prevent my cheesecake from cracking?
- The water bath method helps create a moist environment. Also, avoid overbaking, as too much heat can lead to cracks.
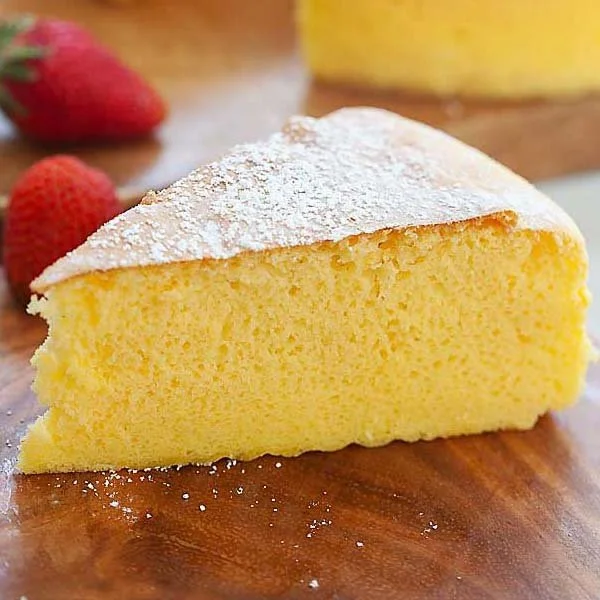
Japanese Cheesecake
Ingredients
Method
- Preheat your oven to 325°F (160°C) and grease a 9-inch springform pan, lining the bottom with parchment paper.
- Melt the cream cheese, butter, and milk over low heat, whisking until smooth and lump-free. Remove from heat.
- Sift together the cake flour and cornstarch in a bowl. Combine the melted cream cheese mixture with egg yolks, lemon juice, and salt, mixing well. Gradually incorporate the sifted flour and cornstarch until a velvety batter forms.
- In a clean bowl, whip the egg whites with cream of tartar until foamy. Gradually add sugar while whipping until soft peaks form.
- Gently fold the cream cheese batter into the meringue, taking care not to deflate the mixture.
- Pour the batter into the prepared springform pan. Tap to remove air bubbles and place the pan in a larger pan filled with 1 inch of hot water. Bake for 70 minutes.
- Leave the cheesecake in the oven with the door slightly ajar for 30 minutes to cool gradually.
- Refrigerate the cheesecake for at least 4 hours, ideally overnight. Dust with powdered sugar before serving.


Leave a Reply