
Chickpea Nuggets are a delightful blend of texture and flavor, making them a fantastic choice for a snack or meal. These vegetarian bites are not just easy to make but also incredibly satisfying, packed with protein and wholesome ingredients that promise to please even the pickiest of eaters. With a beautiful golden exterior and a soft, flavorful interior, they evoke a sense of nostalgia, reminding us of comforting childhood favorites, but in a healthier form. This step-by-step recipe will guide you through creating these crispy wonders that both kids and adults can enjoy.
Ingredients
To bring these Chickpea Nuggets to life, you’ll need the following ingredients:
- Chickpeas: Start with two 15 oz. cans of no salt added chickpeas. These little legumes are creamy and rich in protein, serving as the perfect base for your nuggets.
- Aquafaba: Measure out 10 tablespoons of aquafaba, which is the liquid from the canned chickpeas. This aquafaba is a powerhouse of moisture, helping bind your nuggets while also adding a slight creaminess.
- Oat Flour: Use ¼ cup of oat flour, which can easily be made by blending rolled oats until fine. This flour adds a subtle nuttiness and is a great gluten-free option.
- Nutritional Yeast: Two tablespoons of nutritional yeast provide a cheesy flavor and depth that enriches the overall taste.
- Spices: You will need 1 tsp of fine sea salt, ½ tsp of garlic powder, ½ tsp of onion powder, ½ tsp of paprika, and ¼ tsp of white pepper to elevate the flavor profile with aromatic seasonings.
- Breadcrumbs: For a crispy coating, use ½ cup of fine breadcrumbs. If you’re opting for a gluten-free version, make sure to choose gluten-free breadcrumbs.
- Olive Oil Spray: Lightly spraying the nuggets with olive oil not only enhances browning but also gives a beautiful sheen to the finished product. This is optional if you’re looking for an oil-free alternative.
Step-by-Step Directions
-
Preheat Your Oven: Start by preheating your oven to 400° F. While it heats up, line a baking sheet with parchment paper to ensure your nuggets won’t stick.
-
Prepare the Chickpeas: Open both cans of chickpeas, drain them, and give them a good rinse under cold water. Be sure to reserve the chickpea liquid, known as aquafaba.
-
Process the Chickpeas: Place the drained chickpeas into the bowl of a food processor. Pulse or process the chickpeas on low until finely chopped. They should be crumbly but be careful not to overprocess into a paste.
-
Mix the Ingredients: Transfer the processed chickpeas to a mixing bowl. Add 6 tablespoons of the reserved aquafaba along with the oat flour, nutritional yeast, salt, garlic powder, onion powder, paprika, and white pepper. Stir until everything is well combined.
-
Shape the Nuggets: Using your hands, take portions of the mixture and form them into nugget shapes. Depending on the size, you should yield around 18-20 nuggets.
-
Set Up for Breading: Create a dipping station by pouring ¼ cup of aquafaba into a bowl and spreading breadcrumbs on a plate.
-
Coat the Nuggets: Dip each nugget first into the aquafaba, letting the excess drip off, and then coat with breadcrumbs. Ensure they are completely covered for that perfect crispy finish.
-
Bake the Nuggets: Place the breaded nuggets on the prepared baking sheet in a single layer. If desired, lightly spray the tops with olive oil for enhanced browning. Bake for 15 minutes.
-
Flip and Finish Baking: After 15 minutes, flip each nugget over, spray again with olive oil if using, and return to the oven for another 15 minutes. They should turn golden brown when done.
Tips & Tricks
- Flavor Variations: Feel free to experiment with spices. Adding a pinch of cayenne or cumin can give your nuggets a kick that’ll delight your taste buds.
- Chickpea Substitutes: If you don’t have canned chickpeas, you can cook dry chickpeas but ensure they are well-drained.
- Mix-ins: For added flavor and nutrition, consider incorporating finely chopped vegetables like spinach, bell peppers, or even a handful of herbs like parsley or cilantro into the mixture.
Serving Suggestions & Pairings
Chickpea Nuggets pair wonderfully with various dips, such as tahini sauce, hummus, or a tangy yogurt dip. They make for an excellent appetizer at gatherings, or you can serve them alongside a fresh salad for a wholesome lunch. Try them as part of a cozy family meal, serving them with roasted vegetables or rice for a satisfying dinner.
Nutritional Information
Each serving of Chickpea Nuggets offers a balanced profile, approximately 120 calories, 6 grams of protein, and about 3 grams of fiber. Packed with plant-based goodness, these nuggets are great for maintaining energy levels while feeling full and satisfied.
Storing Tips & Variations
Chickpea Nuggets can be stored in an airtight container in the refrigerator for up to three days. For longer storage, consider freezing them once they are cooled. Reheat it in the oven for about 10-15 minutes at 350°F to regain their crispy texture. Experiment with variations by using different flours like chickpea flour, or add seeds such as sunflower seeds for an additional crunch.
Conclusion
Chickpea Nuggets are not only delicious but also incredibly simple to make. With this straightforward recipe, you’re sure to impress your family and friends with a healthy, homemade snack that everyone will love. Give it a try and feel free to share your experiences and any personalization you made to the recipe!
FAQs
-
Can I make these nuggets ahead of time?
Yes, you can prep the mixture ahead of time and store it covered in the refrigerator. Shape and bake them when you are ready to serve. -
Are Chickpea Nuggets suitable for freezing?
Absolutely! You can freeze the shaped nuggets before baking or freeze the cooked nuggets in an airtight container. -
What can I use instead of aquafaba?
If you don’t have aquafaba, you can try using flaxseed meal mixed with water or any other egg substitute that you prefer. -
Can I air-fry these nuggets?
Yes! Air-frying is a great alternative to baking. Cook at 375°F for about 8-10 minutes, flipping halfway through for an even cook. -
How can I make them spicier?
Add a pinch of cayenne pepper or chili powder to the mixture for an extra kick. Adjust according to your spice preference!
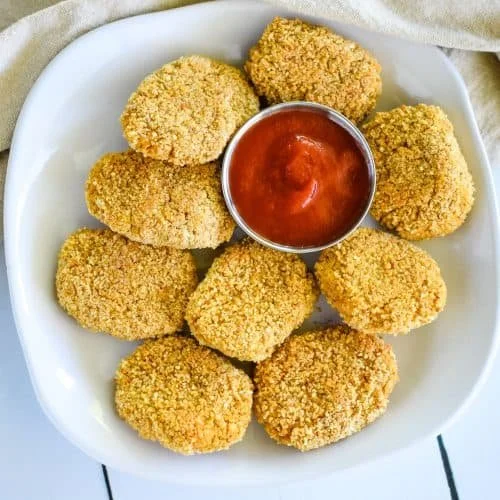
Chickpea Nuggets
Ingredients
Method
- Preheat your oven to 400° F and line a baking sheet with parchment paper.
- Drain and rinse both cans of chickpeas, reserving the liquid.
- Process the drained chickpeas in a food processor until finely chopped.
- Transfer processed chickpeas to a mixing bowl. Add 6 tablespoons of aquafaba, oat flour, nutritional yeast, salt, garlic powder, onion powder, paprika, and white pepper. Stir until combined.
- Form the mixture into nugget shapes, yielding around 18-20 nuggets.
- Set up a dipping station with ¼ cup of aquafaba in a bowl and breadcrumbs on a plate.
- Dip each nugget into aquafaba, then coat with breadcrumbs.
- Place the breaded nuggets on the prepared baking sheet and lightly spray with olive oil if desired. Bake for 15 minutes.
- Flip the nuggets over, spray again if using olive oil, and bake for another 15 minutes until golden brown.

Leave a Reply