
Homemade Qeso Fresco (Queso Casero) is a delightful treat that brings a touch of old-world charm into our modern kitchens. This cheese is known for its soft, crumbly texture and mild flavor that enhances everything from tacos to salads. Making queso fresco at home is not only a rewarding endeavor, but it also allows you to customize the flavors to your liking. With this step-by-step recipe, you’ll learn how easy it is to create your own creamy, fresh cheese right in your kitchen.
Ingredients
For this Homemade Queso Fresco, you’ll need a few simple yet effective ingredients that come together beautifully. Gather 1 gallon of whole milk, which will provide the creamy base for your cheese. Next, you’ll need 2/3 cup of white distilled vinegar or lemon juice; the acidity from these ingredients is essential for curdling the milk. Prepare 4 layers of cheesecloth, a colander for draining, and salt to taste. If you want to get creative, consider adding flavorful inclusions such as minced roasted garlic, zesty salsa macha, diced fresh or roasted jalapeño, or toasted and crushed chiles such as jalapeño de arbol, costeño, or puya. Alternatively, you can simply enjoy it plain, highlighting the cheese’s delightful texture.
Step-by-Step Directions
To create your queso fresco, start by pouring the gallon of whole milk into two separate large, heavy pots, dividing it evenly. Heat the milk over medium heat while stirring gently to avoid scorching. Using an instant-read thermometer, monitor the milk’s temperature closely, aiming for a range between 165-180 degrees F.
Once the milk reaches the desired temperature, gradually add 1/3 cup of vinegar or lemon juice to each pot, stirring gently with a wooden spoon. Be patient; add just 1 tablespoon of vinegar or lemon juice at a time. You’ll notice the curds beginning to separate from the whey.
After the curds have fully formed, remove the pots from heat and allow them to rest for 30 minutes. During this time, the curds will continue to firm up. Next, line a colander with four layers of cheesecloth, ensuring it hangs over the sides slightly to accommodate the curds. Carefully pour the curdled mixture into the lined colander placed in the sink. Let it drain for about 20 minutes to remove excess whey.
Once drained, gather the cheesecloth and twist it to remove any remaining moisture from the cheese. Transfer the cheese to a mixing bowl, and season with salt to taste. Spend a few minutes kneading the cheese, ensuring that the salt is evenly distributed.
At this stage, if you wish to incorporate any flavorings, you can mix them in now. Transfer the cheese back to the bowl, pressing it down firmly until it forms an even compact layer. Cover the bowl with plastic wrap and chill it in the refrigerator overnight.
The next day, to serve your queso fresco, carefully loosen the edges with a small knife or spatula. Flip it onto a serving plate, slice, or crumble as desired. Enjoy your homemade creation as a delightful addition to numerous dishes or as a standalone treat!
Tips & Tricks
To elevate your cheese-making experience, here are a few extra tips:
- Ensure the milk is fresh and not ultra-pasteurized for the best results.
- Don’t rush the curdling process; allow the milk to properly separate for a better texture.
- Experiment with different herbs and spices when kneading the cheese for unique flavors.
- When draining, let it sit longer for a firmer cheese or a shorter time for a creamier consistency.
Serving Suggestions & Pairings
Homemade queso fresco is incredibly versatile. It pairs beautifully with:
- Tacos and burritos, either crumbled on top or used as a filling.
- Fresh salads, adding a creamy, tangy bite.
- Grilled vegetables, melting slightly and enhancing flavors.
- Crackers, serving as a delightful appetizer.
- Mixed into scrambled eggs or omelets, offering a delightful brunch option.
Nutritional Information
While exact nutritional information can vary based on portion size and additional ingredients, here’s an estimate for a serving of queso fresco (about 1 oz):
- Calories: 100
- Protein: 6g
- Total Fat: 7g
- Saturated Fat: 4g
- Sodium: varies (based on added salt)
- Calcium: significant source
Enjoy this cheese in moderation, balancing it with plenty of fruits, vegetables, and whole grains for a well-rounded diet.
Storing Tips & Variations
To store your queso fresco, keep it in an airtight container in the refrigerator, where it should last for about a week. For longer storage, consider freezing it. Wrap portions tightly in plastic wrap and then place them in a freezer-safe container. To reheat, simply thaw in the refrigerator overnight before using.
Variations can include adding herbs like cilantro or chives, spices like smoked paprika, or incorporating sun-dried tomatoes for a burst of flavor.
Conclusion
Making Homemade Queso Fresco (Queso Casero) is a joyous endeavor that yields delicious results. Not only does it allow you to enjoy fresh cheese free of preservatives, but it also opens up a world of culinary possibilities. We encourage you to try this recipe and share your experience. Feel free to experiment with flavors or serve it in your favorite dishes, and let us know how your queso fresco turns out!
FAQs
1. Can I use low-fat or skim milk for queso fresco?
While whole milk provides the best creaminess, you can use low-fat or skim milk, but the resulting cheese may be drier and less flavorful.
2. Can I substitute the vinegar or lemon juice with anything else?
You may try using citrus juices or other types of vinegar, although the acid level might differ slightly.
3. What is the best way to serve queso fresco?
Queso fresco can be served crumbled over salads or tacos, melted into dishes, or simply enjoyed with crackers or fresh bread.
4. How can I tell if my queso fresco has gone bad?
If the cheese develops an off smell, changes in texture, or presents any signs of mold, discard it.
5. Can I infuse different flavors into my queso fresco?
Absolutely! Incorporate your favorite herbs, spices, or even fruits while kneading the cheese to create uniquely flavored cheese.
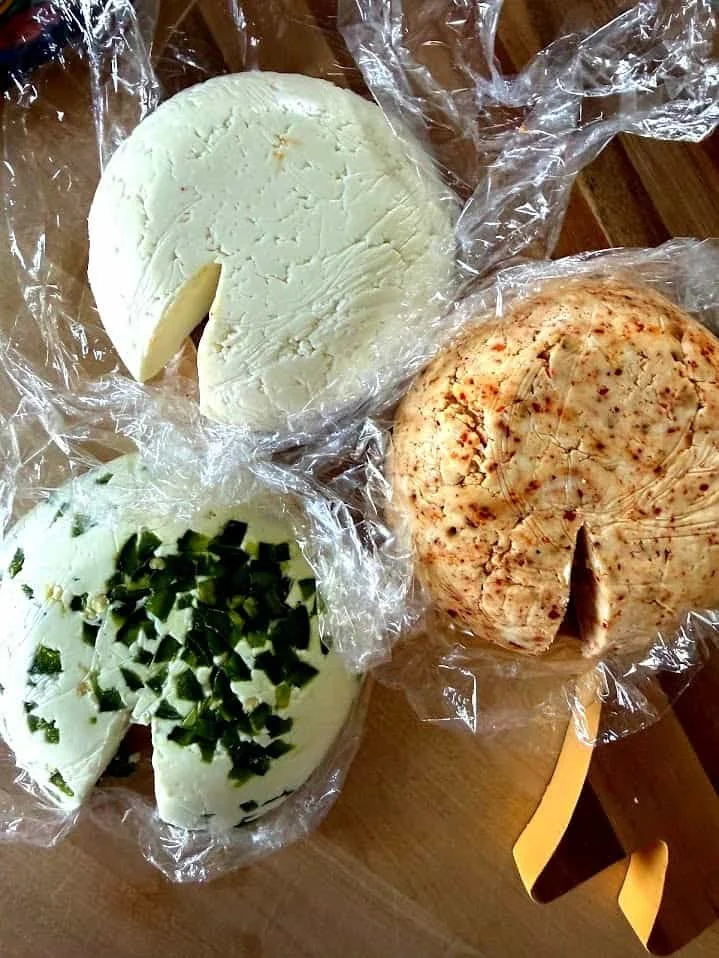
Homemade Queso Fresco
Ingredients
Method
- Pour the gallon of whole milk into two large, heavy pots, dividing it evenly.
- Heat the milk over medium heat while stirring gently to avoid scorching.
- Using an instant-read thermometer, monitor the milk’s temperature closely, aiming for a range between 165-180 degrees F.
- Once the milk reaches the desired temperature, gradually add 1/3 cup of vinegar or lemon juice to each pot, stirring gently.
- Be patient and add just 1 tablespoon at a time. You’ll notice the curds beginning to separate from the whey.
- After the curds have fully formed, remove the pots from heat and allow to rest for 30 minutes.
- Line a colander with four layers of cheesecloth, ensuring it hangs over the sides.
- Carefully pour the curdled mixture into the lined colander placed in the sink and let it drain for about 20 minutes.
- Gather the cheesecloth and twist it to remove any remaining moisture.
- Transfer the cheese to a mixing bowl and season with salt to taste.
- Knead the cheese for a few minutes to distribute salt evenly.
- Incorporate any optional flavorings if desired, then press the cheese down firmly into an even compact layer.
- Cover the bowl with plastic wrap and chill it in the refrigerator overnight.
- The next day, loosen the edges with a knife or spatula, and flip it onto a serving plate.
- Slice or crumble as desired and enjoy your homemade queso fresco.


Leave a Reply