
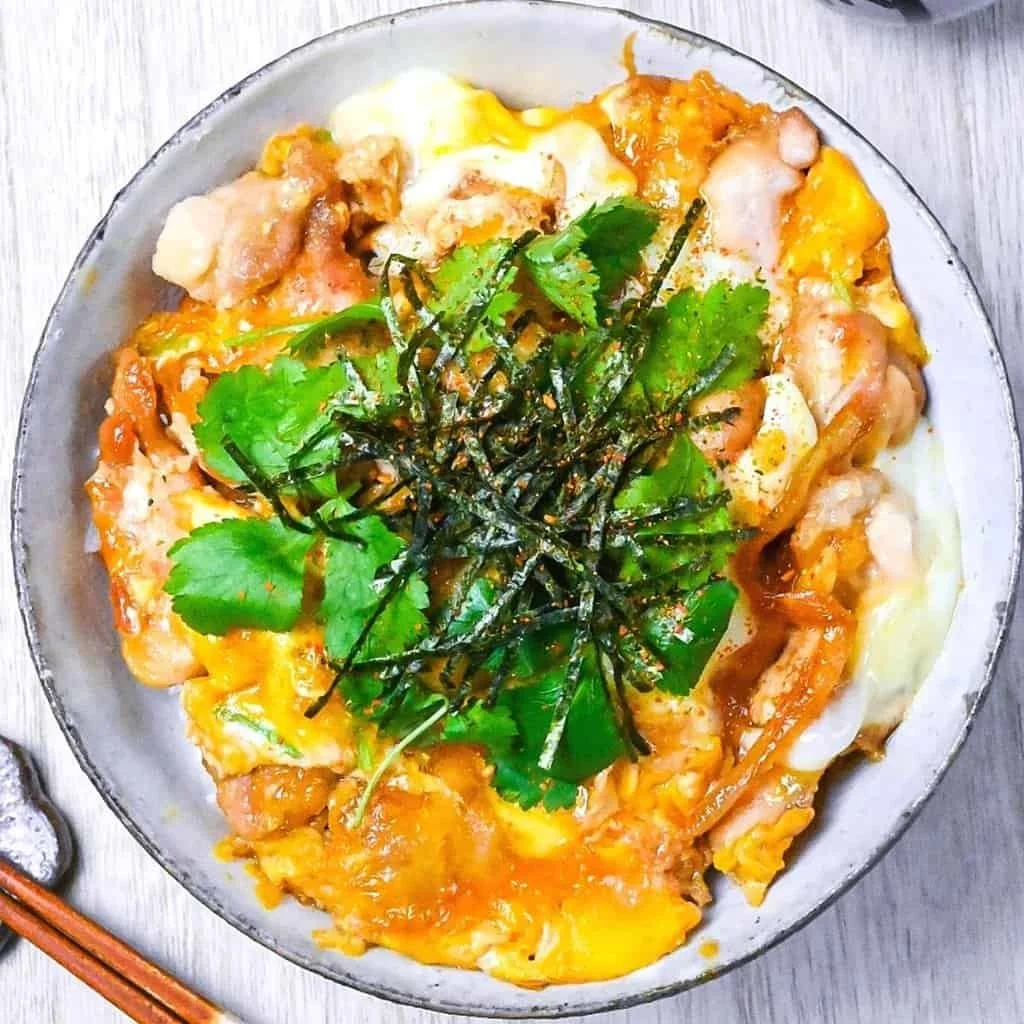
Ultimate Oyakodon (Japanese Egg and Chicken Bowl) is a cozy, comforting dish that perfectly marries tender chicken and creamy eggs over a bed of warm rice. This dish is not just a meal; it’s an experience filled with nostalgia and memories of home-cooked Japanese meals. It’s incredibly easy to make, making it ideal for quick dinners or family gatherings. With its savory flavors and delightful textures, this Oyakodon is sure to become a staple in your kitchen. In this step-by-step recipe, we’ll guide you through creating this heartwarming dish that is perfect for anyone craving a taste of Japan.
Ingredients
To make the Ultimate Oyakodon, you’ll need:
- 300 g boneless chicken thigh: Choose skin-on for added flavor. These bite-sized pieces should be cut across the grain for maximum tenderness.
- 1 pinch salt: Just a touch to enhance the chicken’s flavor.
- 1 tbsp all-purpose flour: A light dusting to help crisp the chicken.
- 1 tsp cooking oil: Use a neutral oil like vegetable, canola, or rice bran.
- 100 ml dashi stock: You can use homemade or instant dashi granules for a beautifully umami-rich flavor.
- ½ onion: Thinly wedges will add sweetness to the dish.
- 3 tbsp mirin: This sweet rice wine adds a nice depth of flavor.
- 1 tbsp light brown sugar: To balance the savory ingredients.
- 1 tsp Chinese-style chicken bouillon powder: Or regular chicken bouillon for an extra flavor boost.
- 2 tbsp Japanese soy sauce (koikuchi shoyu): Essential for that authentic taste.
- 3 eggs: Make sure they are at room temperature for the best results.
- Kizami nori (shredded nori): A delightful garnish that adds a hint of umami.
- Japanese wild parsley (mitsuba) or chopped green onion: Optional but brings a fresh touch.
- 2 portions cooked Japanese short-grain rice: The perfect base to soak up all the delicious sauce.
With these ingredients, you are sure to create a rich, flavorful dish that vibrantly celebrates traditional Japanese cuisine.
Step-by-Step Directions
-
Start by cutting 300 g boneless chicken thigh into bite-sized pieces. Place them in a bowl and season with 1 pinch salt and 1 tbsp all-purpose flour. Mix well until the chicken is evenly coated.
-
Heat a frying pan over medium heat. Once hot, add 1 tsp cooking oil. Place the chicken thigh pieces in the pan, skin-side down, making sure they are in a single layer.
-
Fry the chicken until the skin becomes golden and crispy. Flip the pieces over, searing on the other side. Once cooked, transfer the chicken to a plate and turn off the heat.
-
Wipe the pan with a paper towel to remove excess oil. Pour in 100 ml dashi stock, followed by 3 tbsp mirin, 1 tbsp light brown sugar, and 1 tsp Chinese-style chicken bouillon powder. Mix well and add ½ onion.
-
Turn the heat back on to medium and let the onions simmer until they begin to soften.
-
Once the onions have softened, stir in 2 tbsp Japanese soy sauce (koikuchi shoyu) and return the sautéed chicken to the pan, spacing them apart to ensure even cooking.
-
In two separate bowls, separate the whites and yolks of 3 eggs.
-
Whisk the egg whites and carefully pour them around the chicken in the pan. (At this stage, do not add the yolks yet.) Cover with a lid and let it cook for about 3 minutes, or until the whites start to turn opaque.
-
Reduce the heat to the lowest setting and remove the lid. Now whisk the egg yolks and pour them into the pan, again ensuring even distribution. Cover and cook until preferred doneness is reached, aiming for slightly runny yolks for authenticity.
-
Use a spatula to divide the egg and chicken mixture into portions suitable for serving. Scoop the delightful mixture onto 2 portions of cooked Japanese short-grain rice.
-
Drizzle any remaining sauce from the pan evenly over each serving and garnish with kizami nori and Japanese wild parsley (mitsuba). Enjoy!
Tips & Tricks
To elevate your Oyakodon, consider these tips:
- Use fresh ingredients: Fresh chicken and vegetables will make a significant difference in flavor and texture.
- Adjust sweetness and saltiness: Feel free to taste as you go and adjust the mirin and soy sauce according to your preference.
- Temperature matters: For the best results, using room temperature eggs helps them cook evenly.
Serving Suggestions & Pairings
Oyakodon is best served warm, directly from the pan to the table, giving it that fresh-home-cooked feel. It pairs wonderfully with pickled vegetables for added crunch and acidity, or even a refreshing miso soup on the side for a complete meal. This dish is perfect for family dinners, casual get-togethers, or even as a comforting meal when you need a pick-me-up.
Nutritional Information
Each serving of Oyakodon (with rice) is approximately 600 calories. This includes protein from chicken and eggs, carbohydrates from rice, and fats from the cooking oil. It’s a well-rounded meal, but be sure to balance it with plenty of vegetables throughout your day for a healthier, complete diet.
Storing Tips & Variations
Leftovers of Oyakodon can be stored in an airtight container in the refrigerator for up to 2 days. You can easily reheat it gently over low heat on the stove or in the microwave. You can also try variations by using different proteins like tofu or seafood or adding seasonal vegetables like spinach or mushrooms for an extra nutritional boost.
Conclusion
We encourage you to try this Ultimate Oyakodon recipe and indulge in the flavors of this heartwarming dish. Feel free to share your experience and any personal twists you make to the recipe with us! Cooking is all about creativity, so make this dish your own!
FAQs
-
Can I make Oyakodon without dashi stock?
Yes! You can substitute dashi with chicken broth or even vegetable broth in a pinch for a different flavor profile. -
What if I don’t have mirin?
If you don’t have mirin, you canuse a mixture of rice vinegar and sugar as a substitute, but the flavor won’t be exactly the same. -
Is there a vegetarian version of Oyakodon?
Absolutely! You can swap the chicken for tofu and use vegetable broth instead of dashi to create a delicious vegetarian version. -
How can I make the chicken more tender?
Marinating the chicken in a mixture of soy sauce and a bit of mirin or sake for about 30 minutes before cooking can help to enhance tenderness. -
What type of rice should I use for Oyakodon?
Japanese short-grain rice is recommended for its stickiness, which helps hold the dish together beautifully.
Oyakodon
Ingredients
Method
- Cut 300 g boneless chicken thigh into bite-sized pieces. Season with 1 pinch salt and 1 tbsp all-purpose flour. Mix until evenly coated.
- Heat a frying pan over medium heat and add 1 tsp cooking oil. Place the chicken skin-side down in a single layer.
- Fry until the skin is golden and crispy. Flip and sear the other side. Transfer to a plate and turn off the heat.
- Wipe the pan with a paper towel to remove excess oil. Pour in 100 ml dashi stock, 3 tbsp mirin, 1 tbsp light brown sugar, and 1 tsp Chinese-style chicken bouillon powder. Mix well and add ½ onion.
- Turn the heat back on to medium and let onions simmer until softened.
- Stir in 2 tbsp Japanese soy sauce and return the chicken to the pan, spacing apart.
- Separate the whites and yolks of 3 eggs into two bowls. Whisk the egg whites and carefully pour them around the chicken.
- Cover with a lid and cook for about 3 minutes, until the whites turn opaque.
- Reduce heat to the lowest setting, add the egg yolks, cover, and cook until preferred doneness is reached.
- Use a spatula to divide the mixture into portions for serving and scoop onto 2 portions of cooked rice.
- Drizzle any remaining sauce over each serving and garnish with kizami nori and Japanese wild parsley.


Leave a Reply